Registration Steps
You’re in! Now let’s get you registered. Follow the steps to confirm your registration status, select your courses, and build your schedule for the term. The entire process can be completed in the Pace student portal. Keep this page open alongside your student portal as you work through your registration.
1
Check Your Registration Status and Time
Before registering, you will need to confirm that your account is clear of any holds and check your assigned registration date and time. Here’s how you do it:
Navigate to the Pace student portal and log in with your Pace credentials.
Haven’t activated your account yet?
- Visit adam.pace.edu
- Follow the activation instructions
- Confirm you are able to log in successfully
From the Registration menu, click the Prepare for Registration link.

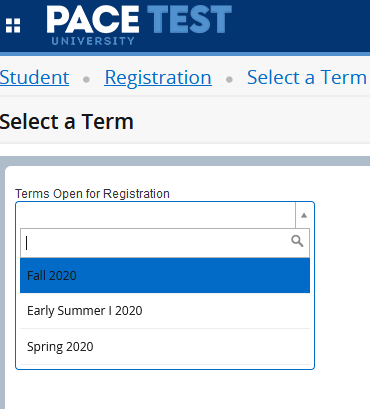
Select the upcoming term from the list of available options.
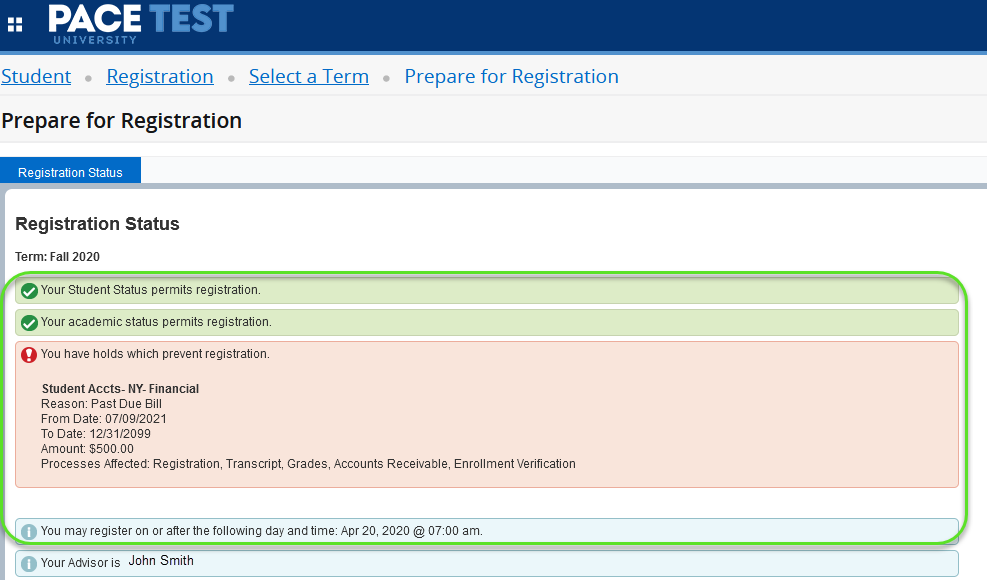
Your Registration Status page will display one of the following:
- Cleared to register — You’re ready to proceed.
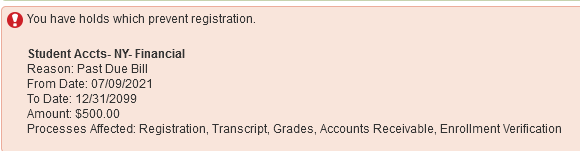
- Hold on your account — Any holds (such as a past-due balance) will be highlighted in red. You’ll need to resolve these before you can register for courses.
Your assigned registration date and time will also appear on this page. You may not register before your assigned time.

2
Register for Courses
Once your registration window opens and your account is clear, you can enroll in your courses by following these steps:
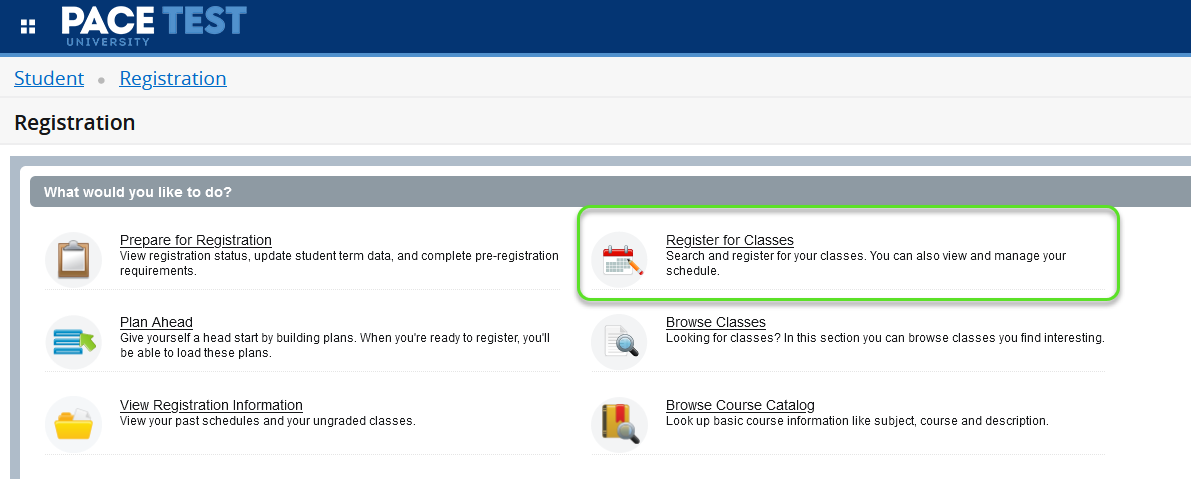
From the Registration menu, click the Register for Classes link and select your term.
There are two ways to search and register. Choose the method that works best for you:
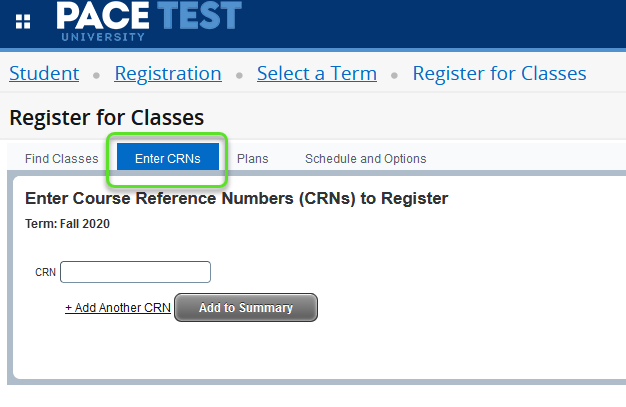
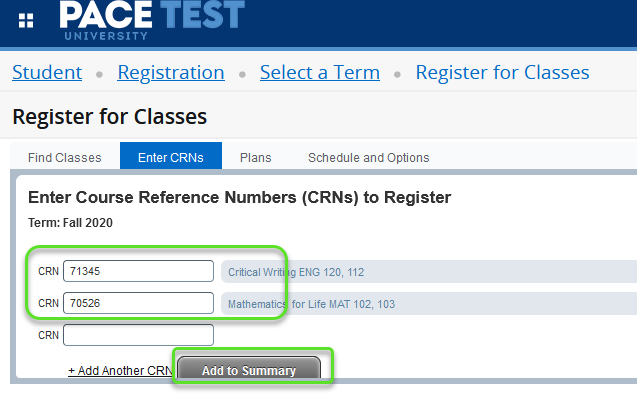
Option A: Enter CRNs Directly
If you already have your Course Reference Numbers (CRNs), click the Enter CRNs tab.
Type each CRN into the provided fields, click + Add Another CRN to add more, then click Add to Summary.
Option B: Search by Subject
If you don’t have the CRNs, click the Find Classes tab. Type in the subject of the course you’re looking for (e.g., English, Business).
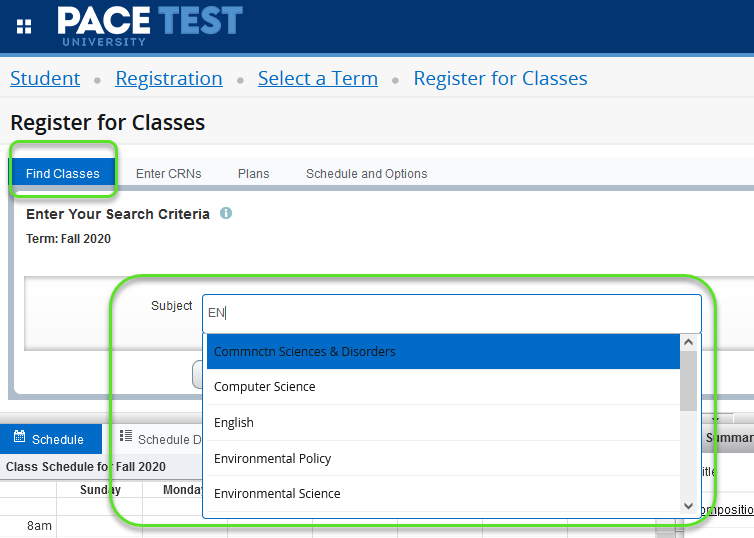
Add a course number (ex. 101) or leave blank to search for all course numbers for a selected subject. Click the Search button to continue. Click Add next to any course to add it to your summary.

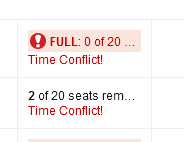
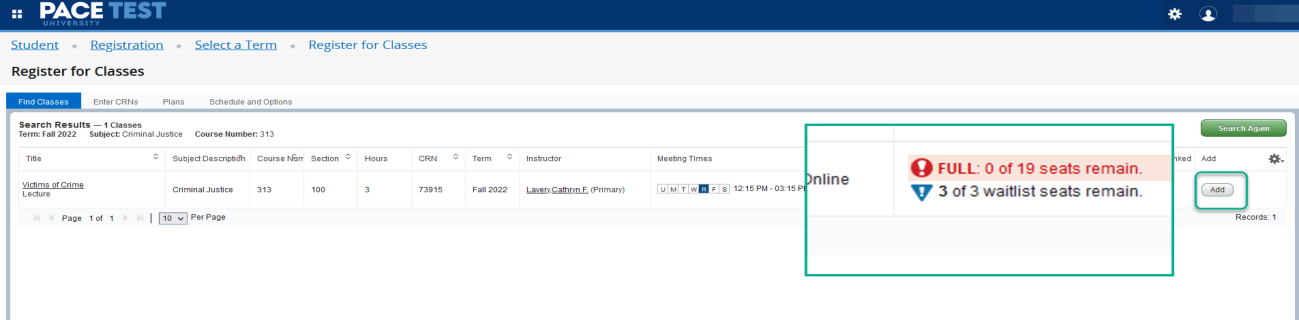
Note: Courses that are full or conflict with your existing schedule will be highlighted. You can add yourself to the waitlist for courses that you want to take (see the “Waitlist for a Course” section below).
Before registering, review all courses in your Summary panel. To remove a course, select Remove from the Action dropdown next to that course.
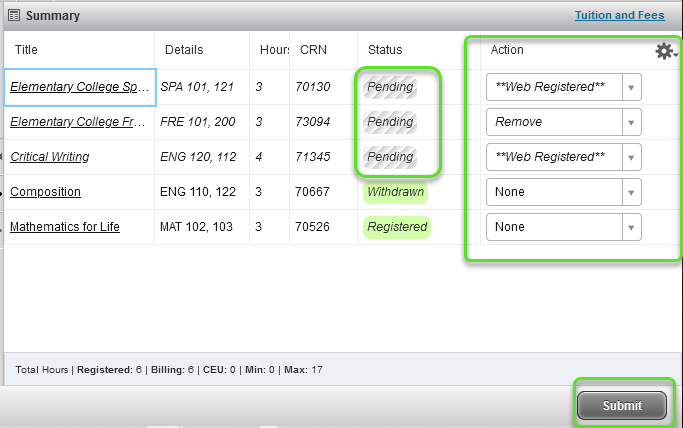
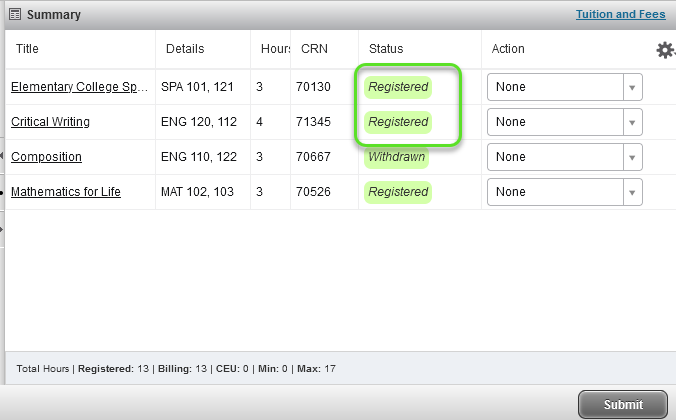
When your summary is ready, click the Submit button. Courses will remain in Pending status until you submit.
Important: You are not enrolled in a course until you click Submit and see a Registered status in your summary.
3
Waitlist for a Course
If a course is full, you can add yourself to the waitlist. Waitlist priority is determined by class standing: seniors first, then juniors, sophomores, and freshmen.
In the search results, check the Status column to see how many waitlist spots remain.
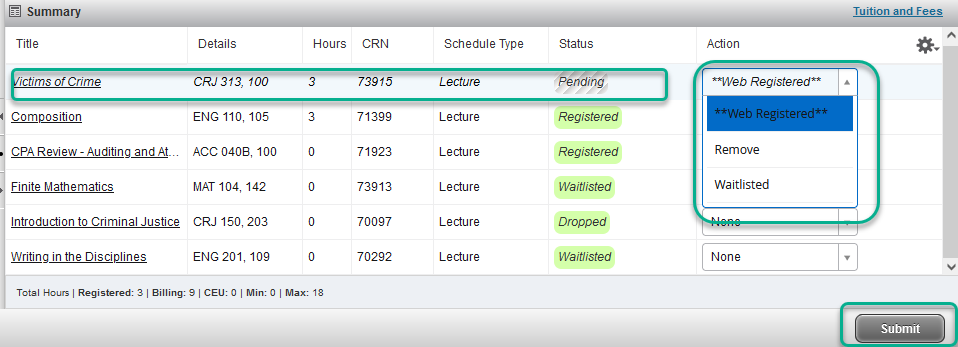
Click Add to include the course in your Summary. In the Summary panel, open the Action dropdown next to that course and select Waitlisted. Then click Submit.
If a seat opens up, you’ll receive an email at your Pace address. You’ll have 24 hours to act. After that, the next student in line is notified.
Important: You are not automatically enrolled when notified. You must return to Register for Classes, find the course in your Summary, select Web Registered from the Actions dropdown, and click Submit.
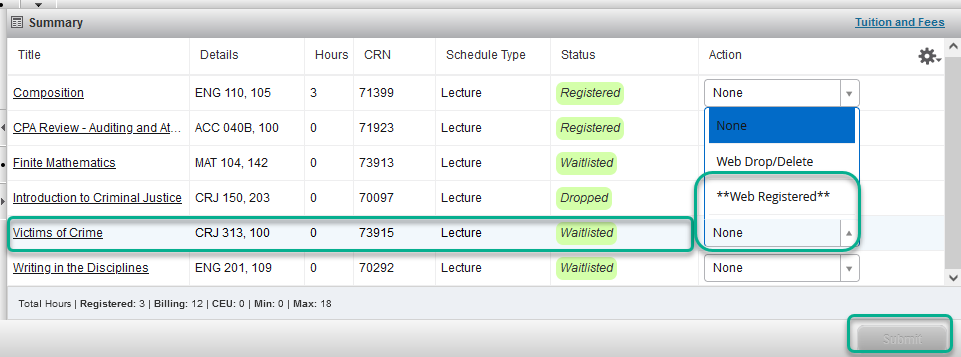
You are now registered for the previously waitlisted course!

4
Drop or Withdraw from a Course
Need to make a change to your schedule? You can drop or withdraw from a course through the portal. Deadlines vary by term. Check the academic calendar before taking action.
Select the term that contains the course you want to drop or withdraw from.
In your Summary, click the Action dropdown next to the course and choose one of the following:
- Web Drop/Delete — Removes the course from your record. Dropped courses will initially show a “Deleted” status and will disappear when you refresh the page.
- Web Withdrawn Course — Withdraws you from the course after the drop deadline. Withdrawn courses remain in your summary with a “Withdrawn” status.
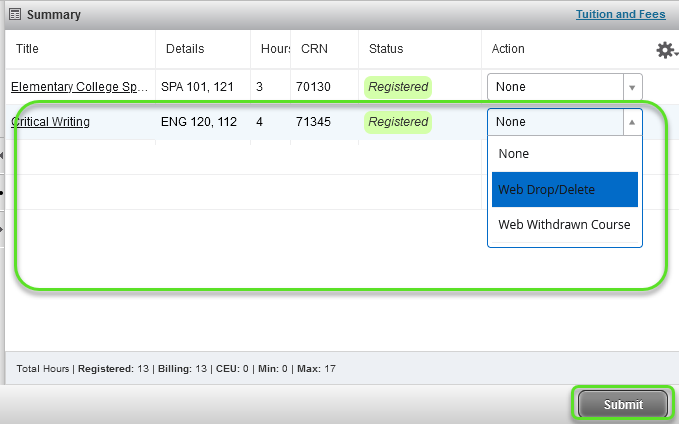
Click the Submit button to process the action. Always confirm the updated status in your Summary before logging out.

5
Review Your Course Schedule
Once you’ve registered, confirm your schedule looks correct before the term begins.
Use the arrow controls on the page to expand the Schedule panel in the lower-left corner.
Your course schedule will appear in a weekly calendar view. Scroll down to see evening course times.
If your classes are fully online, asynchronous, the modality will show up as ‘asynch’.
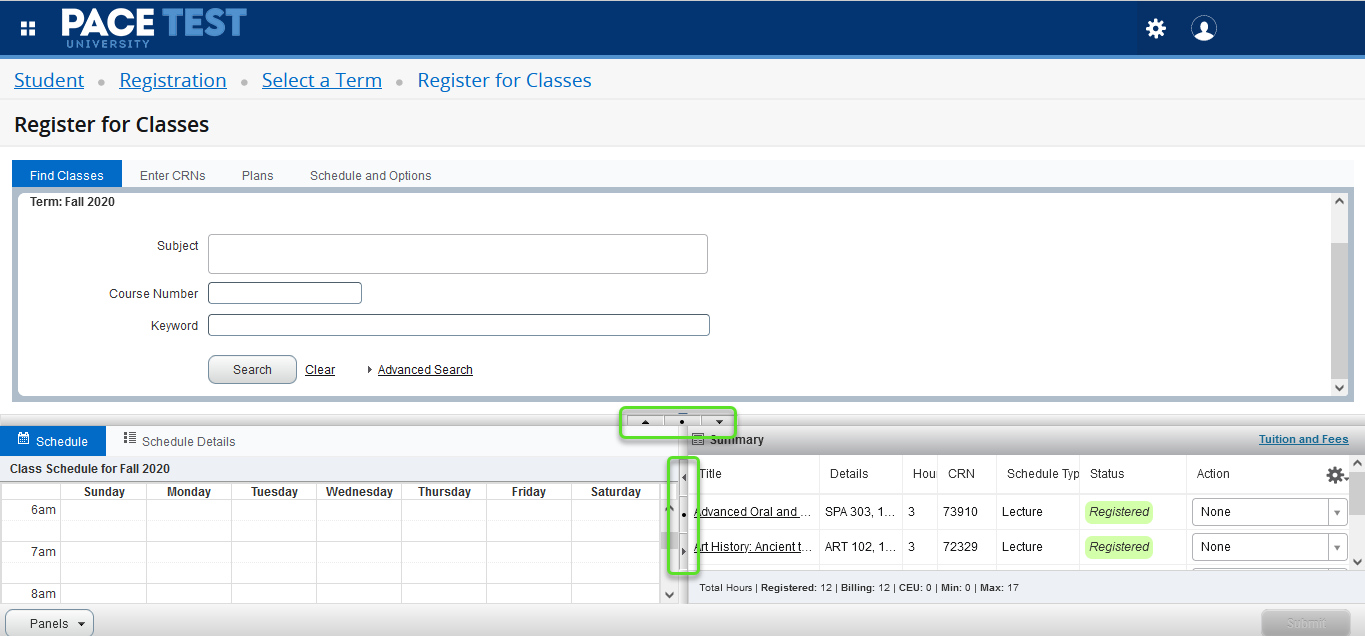
Click the Schedule Details tab for full information on each registered course, including meeting times, instructors, and CRNs.

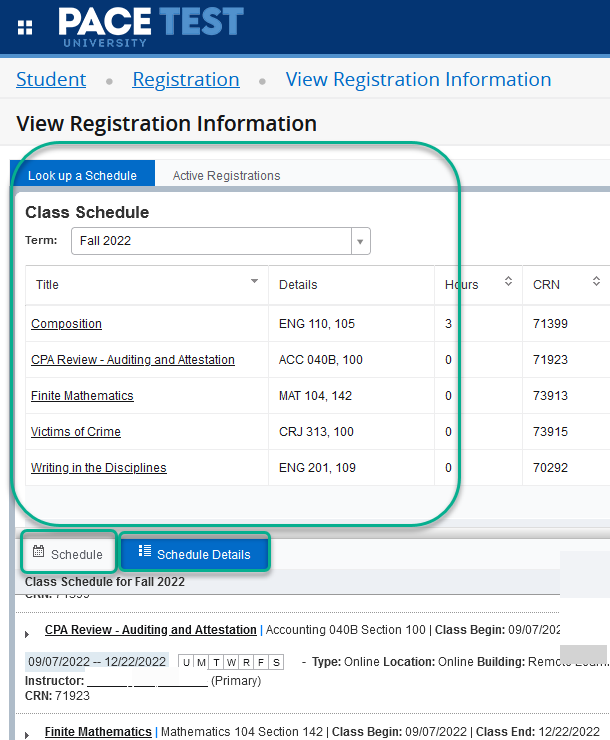
Tip: If you have an account hold that prevents you from accessing “Register for Classes,” use the View Registration Information link on the main Registration menu to review your schedule from any term.
Need Help?
Want someone to walk through the registration process with you? We’re here to help.
If you encounter any errors during activation or registration, please contact the ITS Help Desk immediately for assistance.
ITS Help Desk Contact Information:
Phone: (914) 773-3333
Toll Free (within the U.S.): 1 (855) 722-3487
Email: pacehelpdesk@pace.edu
Online Support: itshelpdesk.pace.edu
The ITS team can assist with both minor and major technical issues related to registration.
Your academic advisor is your first point of contact for any registration questions. You can also reach our online program teams directly.
Frequently Asked Questions
Your assigned registration date and time are available through the Prepare for Registration link in the student portal. Registration is time-ticketed, meaning each student is assigned a specific window. You may not register before your assigned time.
Holds that prevent registration will be highlighted on your Registration Status page, along with the reason and the office to contact. Common holds include financial balances.
A CRN (Course Reference Number) is a unique identifier assigned to each section of a course for a given term. Your academic advisor may provide CRNs directly, or you can find them by searching under the Find Classes tab.
If a course is full, add yourself to the waitlist (see the “Waitlist for a Course” section above). If a seat becomes available, you’ll be notified at your Pace email address and will have 24 hours to complete registration. You can also contact your academic advisor to discuss alternative course options.
Dropping a course removes it from your record entirely and occurs before the drop deadline. Withdrawing occurs after the drop deadline. Students receive no credit for courses they discontinue, and withdrawal after the second week of class in a 14- or 15-week semester (or its equivalent) will result in a grade of “W,” which will not affect your GPA. Review the academic calendar or contact your advisor before making a decision.
No, courses remain in “Pending” status until you click the Submit button. After submitting, your status should update to Registered. If it does not, or if you see an error, contact your academic advisor or the relevant online program team.